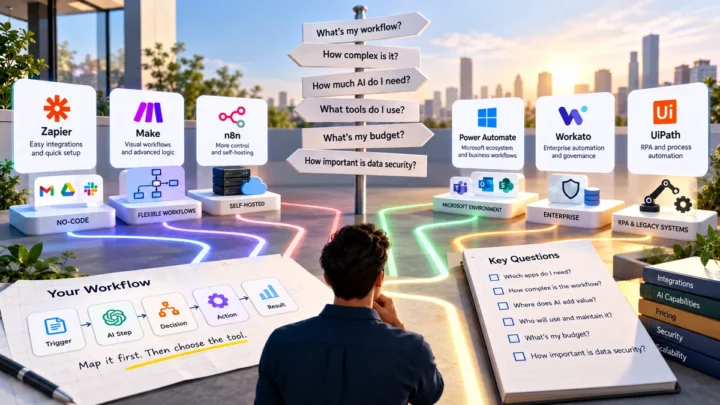
You can build an AI workflow without writing code. Start with one repetitive task, map the process, add AI where it provides value, connect the required apps, and test the workflow before putting it into regular use.
The technology is becoming easier to use.
Many no-code platforms now let you connect apps, AI models, triggers, and actions through visual builders. You do not necessarily need programming skills to create a useful workflow.
But there is one important point.
The hardest part is usually not building the workflow.
It is choosing the right task to automate.
A good AI workflow should solve a real problem. It should save time, reduce repetitive work, or improve how information moves through a business.
This guide explains how to build one from the ground up.
What Is a No-Code AI Workflow?
A no-code AI workflow is an automated process that uses AI for one or more steps without requiring you to write the underlying code.
A simple workflow might look like this:
Something happens
↓
AI processes the information
↓
A rule or decision determines what happens next
↓
Another app takes action
For example:
New customer email
↓
AI identifies the request
↓
Classify as sales or support
↓
Send it to the right team
The workflow platform handles the connections between the different steps.
The AI handles the part that requires understanding, classification, summarization, generation, or another language-based task.
Before Building an AI Workflow, Find the Right Task
This is where you should start.
Do not start by choosing an AI automation tool.
Start by looking at the work you already do.
Find a task that:
- Happens repeatedly
- Takes noticeable time
- Follows a recognizable process
- Involves information AI can understand
- Has a clear desired result
For example, imagine a business receives dozens of customer emails every day.
Employees currently read every message and decide where it should go.
That could be a good automation opportunity.
The process might become:
Customer email → AI classification → Team assignment → Notification
Recent 2026 guidance around AI adoption increasingly emphasizes starting with a real business bottleneck rather than adopting AI simply because the technology is available.
Don’t Automate a Broken Process
There is another step many beginners skip.
Understand the existing process first.
Suppose your team manually processes customer leads.
Before automating it, write down what currently happens:
- A lead arrives.
- Someone reads the information.
- Someone decides whether it is relevant.
- The lead is entered into the CRM.
- A salesperson receives a notification.
- The salesperson follows up.
Now you can ask:
Which parts actually need AI?
Maybe the answer is only step two and three.
The rest can remain ordinary automation.
This is important because AI does not need to replace every part of a workflow. Zapier’s 2026 analysis of AI workflows found that conventional automation still handled most workflow steps among the organizations it studied.
Map Your Workflow Before You Build It
A simple workflow map can prevent a lot of confusion.
Use this framework:
Trigger → AI Task → Decision → Action → Result
For example:
Trigger
A customer submits a form.
↓
AI Task
AI reads and classifies the message.
↓
Decision
Is it a sales inquiry or a support request?
↓
Action
Send it to the appropriate team.
↓
Result
The request reaches the right person automatically.
This gives you a basic blueprint before you open any automation platform.
Step 1: Define the Trigger
Every workflow needs something that starts it.
This is called the trigger.
A trigger could be:
- A new email
- A form submission
- A new CRM record
- A new spreadsheet row
- A customer support ticket
- A calendar event
- A new document
- A scheduled time
For example:
A customer submits a contact form.
That event starts the workflow.
Why the trigger matters
A poorly defined trigger can cause unnecessary workflow runs.
You should know exactly when the workflow should start.
Step 2: Decide What AI Should Do
Now identify the part where AI actually adds value.
AI can be useful for tasks such as:
- Classifying text
- Summarizing information
- Extracting details
- Drafting content
- Understanding customer messages
- Categorizing documents
- Analyzing unstructured information
For example:
Read this customer message and classify it as Sales, Support, Billing, or Other.
That is a useful AI task because the wording of every customer message can be different.
Traditional rules may struggle with that variation.
AI can interpret the language and produce a category.
Step 3: Don’t Use AI Where Normal Automation Is Enough
This is one of the most important principles in this article.
Suppose your workflow needs to do this:
New form submission → Add row to spreadsheet
You probably don’t need AI.
The instruction is already clear.
Likewise:
New payment → Send confirmation email
A normal automation can handle it.
AI becomes more useful when the system needs to understand, interpret, classify, summarize, generate, or reason about information.
Zapier’s 2026 analysis supports this selective approach. Its studied AI workflows used AI for specific roles while relying on rules, app connections, data movement, and other conventional automation for the remaining steps.
A useful rule is:
Use AI for the parts that need understanding. Use normal automation for the parts that simply need execution.
Step 4: Choose a No-Code Automation Platform
Once you understand the workflow, choose the platform that can connect the required services.
Popular options include:
- Zapier
- Make
- n8n
- Automation features built into existing business software
These platforms differ in their integrations, visual builders, flexibility, hosting options, and level of control.
For a first workflow, you don’t necessarily need the most powerful platform.
Choose one that supports:
- Your trigger
- Your AI model or AI feature
- Your required applications
- Your desired actions
Current no-code guides commonly use platforms such as Zapier, Make, and n8n for this type of workflow.
Don’t choose the platform first.
Choose the workflow first.
Then choose the platform that can handle it.
Step 5: Connect Your Trigger
Now create the first step in your automation platform.
For our example, the trigger could be:
New customer email
The platform watches for that event.
When a new email arrives, the workflow starts.
At this point, nothing needs to be complicated.
Your first goal is simply:
Make sure the workflow starts when the right event occurs.
Step 6: Add the AI Step
Now connect your AI step.
For example:
Read the customer email and classify it as:
- Sales
- Support
- Billing
- Other
You should give the AI clear instructions.
Instead of:
“Understand this email.”
Use something more specific:
Read the email and return exactly one category: Sales, Support, Billing, or Other.
Clear instructions make the output easier to use in the next step.
Step 7: Decide What Happens After the AI Result
Now the workflow needs to use the AI’s output.
For example:
Sales
→ Sales team
Support
→ Support team
Billing
→ Finance team
Other
→ General support
This is where traditional automation becomes important again.
AI provides the classification.
The workflow uses that classification to perform the next action.
So the complete process becomes:
Customer email
↓
AI classification
↓
Workflow rule
↓
Correct team
↓
Notification or ticket
This combination is often more useful than trying to make AI control everything.
Step 8: Add the Final Action
The action depends on your business.
It could:
- Create a CRM record
- Create a support ticket
- Send a notification
- Add information to a spreadsheet
- Send an email
- Update a database
- Create a task
For example:
AI says “Sales”
↓
Create sales task
↓
Notify salesperson
Now the workflow has completed its job.
Step 9: Add Human Review Where It Matters
Not every AI decision should happen without human oversight.
For example, you might allow AI to:
Read a customer complaint
Summarize the problem
Draft a response
But you may want a person to approve the response before it is sent.
The workflow could be:
Customer message
↓
AI analyzes it
↓
AI drafts response
↓
Human reviews
↓
Send response
This is called human-in-the-loop automation.
Microsoft’s current workflow documentation specifically supports human-in-the-loop gates when a person should make or approve a decision.
For sensitive actions, this extra step can be especially important.
Step 10: Test the Workflow
Never assume the workflow works because the individual steps look correct.
Test it.
Start with a normal example.
Then test unusual cases.
Test 1: Normal input
A clear customer request.
Test 2: Unclear input
A message that could belong to two categories.
Test 3: Missing information
A customer leaves out important details.
Test 4: Unexpected input
A message that does not match any category.
Test 5: Incorrect information
The input contains errors or incomplete data.
Check what happens each time.
Ask:
- Did the trigger work?
- Did AI understand the input?
- Was the output in the expected format?
- Did the workflow choose the correct path?
- Did the right application receive the information?
- Did the workflow stop when it should?
Testing is especially important because an AI output can vary more than a simple rule-based action.
Step 11: Create a Fallback
What happens when AI is unsure?
You should decide this before the workflow goes live.
For example:
AI is confident
→ Continue automatically
AI is uncertain
→ Send to a human
This is safer than forcing every input through the same path.
A useful workflow might therefore look like:
New email
↓
AI classification
↓
High confidence?
Yes → Continue
No → Human review
This gives the workflow an escape route.
Step 12: Measure Whether It Actually Helps
An AI workflow isn’t successful simply because it runs.
It should improve something.
Before launching it, record a basic baseline.
For example:
Before automation
100 emails
4 hours of manual work
After automation
100 emails
1.5 hours of manual review
Now you have something measurable.
You can also track:
- Processing time
- Manual work
- Error rate
- Number of escalations
- Cost per task
- Response time
- Number of completed tasks
The important question is:
Did the workflow make the process better?
Current business guidance increasingly recommends measuring AI through concrete outcomes rather than simply counting AI deployments.
A Complete No-Code AI Workflow Example
Let’s put everything together.
Imagine a small business receives customer inquiries through email.
The old process
Email arrives
↓
Employee reads it
↓
Employee identifies the type
↓
Employee forwards it
↓
Team responds
This takes time.
The new workflow
Email arrives
↓
AI reads the message
↓
AI classifies the request
↓
Workflow checks the category
↓
Sales → Sales team
Support → Support team
Billing → Finance team
↓
Create task or notification
↓
Human handles the request
The workflow doesn’t replace the entire process.
It removes repetitive steps.
That’s often where AI automation becomes useful.
What Should Your First AI Workflow Automate?
If you are new to AI automation, don’t start with a huge project.
Look for one repeated task.
Good starting points include:
Email classification
AI categorizes incoming messages.
Lead qualification
AI extracts information and helps classify potential leads.
Meeting summaries
AI turns meeting transcripts into summaries and action items.
Document extraction
AI extracts specific information from invoices, forms, or documents.
Customer support routing
AI identifies the type of request and sends it to the appropriate team.
Report preparation
AI summarizes information before sending it to a person for review.
These tasks have a common characteristic:
They involve information that is difficult to handle with simple rules alone.
Common AI Workflow Mistakes
1. Starting with the tool
Don’t ask:
Which AI automation platform should I use?
First ask:
What problem am I trying to solve?
2. Automating everything
You don’t need AI in every step.
Use ordinary automation when ordinary automation works.
3. Choosing a complicated workflow
Your first workflow doesn’t need ten AI steps.
Start small.
You can expand it later.
4. Ignoring exceptions
Ask what happens when the AI is wrong.
Build a fallback.
5. Giving AI too much access
Only give the workflow the permissions it actually needs.
This is especially important when the workflow can access customer information, financial systems, internal documents, or business accounts.
6. Skipping measurement
If you don’t measure the original process, you may never know whether automation actually helped.
A Simple AI Workflow Blueprint
You can use this framework whenever you want to automate a new process.
1. Problem
What repetitive task takes time?
↓
2. Trigger
What starts the process?
↓
3. AI task
What needs understanding, classification, extraction, summarization, or generation?
↓
4. Rule
What should happen based on the AI result?
↓
5. Action
Which application should do something?
↓
6. Human review
Where should a person check the result?
↓
7. Measurement
How will you know the workflow improved the process?
This seven-step framework is more important than any particular automation platform.
The platform can change.
The framework remains useful.
When Should You Not Use AI?
This is an important question.
You may not need AI when:
- The task follows simple rules.
- The input is already structured.
- A normal automation handles the job.
- The process happens very rarely.
- The cost of automation exceeds the benefit.
- The task requires judgment that should remain with a person.
For example:
When a new customer submits a form, add the data to the CRM.
That’s ordinary automation.
You don’t need AI simply because you can add it.
The best workflow is often the simplest workflow that solves the problem reliably.
What Can You Automate With AI Next?
Once your first workflow works, you can look for other opportunities.
You might connect:
Email → AI → CRM
or
Forms → AI → Spreadsheet
or
Documents → AI → Database
or
Support tickets → AI → Help desk
or
Meetings → AI → Tasks
The important thing is to expand gradually.
Don’t build a complicated network of automations before you understand how the first one performs.
Final Takeaway
Building an AI workflow without coding is easier than it used to be.
But the technology isn’t the most important part.
Start with the work.
Find a repetitive process.
Map the existing steps.
Identify where AI can add value.
Use normal automation for predictable actions.
Add human review where mistakes matter.
Then measure the result.
You don’t need to automate everything.
You need to automate the right things.
Don’t start with AI. Start with the problem. Then use AI where it actually improves the process.
Related guides: AI for Small Business: A Practical Guide to Tools, Automation and Privacy · What Is AI Workflow Automation? How It Works and Where It Helps
Frequently Asked Questions
Can I build an AI workflow without coding?
Yes. No-code automation platforms can connect triggers, AI steps, applications, and actions through visual interfaces. The exact capabilities depend on the platform and integrations available.
Do I need to be a developer to build an AI workflow?
No. Many basic workflows can be created without programming. However, complex integrations, custom logic, security requirements, or large-scale systems may eventually require technical help.
What is the easiest AI workflow to build?
A simple workflow with one trigger, one AI task, and one action is a good starting point.
For example:
New email → AI summarizes it → Save summary
Which tool should I use to build an AI workflow?
There is no single tool that is best for every workflow. Consider the applications you already use, required integrations, complexity, cost, data handling, and how much control you need.
Does every AI workflow need an AI agent?
No.
Many workflows only need a defined process with one or more AI steps. AI agents are more useful when the system needs greater flexibility in deciding what to do next.
Is no-code AI automation safe?
It can be, but safety depends on how the workflow is designed. Limit permissions, protect sensitive information, test the workflow, monitor its results, and use human approval for important actions.
How do I know if an AI workflow is successful?
Measure the result against the old process.
Look at time saved, errors, processing speed, manual effort, cost, or another metric that matters to your business.